Re-using our HiFi in a Media Hub setup

One of my “nerdy” posts, written principally to explain to myself what I’ve done, why I’ve done it and how I achieved it.

For a long time we’ve had the TV (Samsung UE32D6530) with a Blu-Ray 2.1 Home Entertainment Centre (Samsung HT-D5200) in one room and our HiFi system in another room feeding two sets of speakers in rooms other than the one the TV is in. OK so far?

The BluRay sound output was OK but not that subtle and certainly I had problems with a) getting headphone output for late night listening to music concerts, and b) lip sync between the BluRay player and the TV, which could be very annoying and difficult to resolve in a time short enough to actually enjoy the music!! Coupled to that there was always the need to have the BluRay controller and the TV controller to watch TV. The first to control the audio, the second the HDMI sources.

Every project requires a driver. What happened was that we were thinking about knocking a couple of rooms together the effect of which would be to disturb where the HiFi was. “Why don’t you move it into the room with the TV?” – it was suggested. So … anticipating needing to buy an AV Receiver and lots of other stuff like a Soundbar, I went off to Richer Sounds (Cardiff) where Andie amazed me by advising I didn’t need to spend anything. My existing Marantz amp (PM 6005) had an Optical connection, so it could take the sound input from the TV which also had an Optical outpuut, as it had 4 HDMI ports, could act as the hub instead of needing to buy an AV Receiver. Amazing and what service too!

So I set it up. The four HDMI ports on the TV taking a MacMini, the BluRay player (now with its speakers disconnected), the Cable TV and a 3rd generation Apple TV. The amp taking input from a CD player (Cambridge Azur 540C) and a Tuner (Denon TU-260) – we’ll leave connecting the deck for another day. The TV and the amp connected by an optical cable. I tested it using an existing pair of speakers. Brilliant sound and everything worked. All problems resolved and much easier to use as the Marantz remote control handles all the sound, the TV remote controls all the video sources with of course the Cable TV controller being used for channel selection, etc.

I was getting excited. Perhaps I could benefit even more from a new pair of compact speakers, thus allowing me to leave the existing Bose Acoustimass 5 and Gale speakers in place. I was easily persuaded back at Richer Sounds to try out at home a demo pair of Monitor Audio Radius 90 speakers. After only a few plays of DVD, CD, iTunes, TV and BluRay media I was quickly persuaded this was the right choice and that’s the setup you see in the picture, with one additional hidden addition.

How might I integrate my digital music in a better way than I was currently doing it via the Apple TV, and iTunes on the MacMini? The answer … a Sonos Connect system with RCA output to the Marantz amp connected to the iTunes Media folder and a copy of the iTunes Library hosted on a USB-3 disk connected to an AirPort Extreme router. [The master iTunes Library is shared (using Dropbox) around the other 3 Macs in the house – a brilliant solution to avoid maintaining different iTunes Libraries.] I can now listen to the digital music in all three rooms.  Of course, now I have a Sonos Connect, I can stream to other Sonos Play speakers … but that’s for another day, which may actually come sooner rather than later.
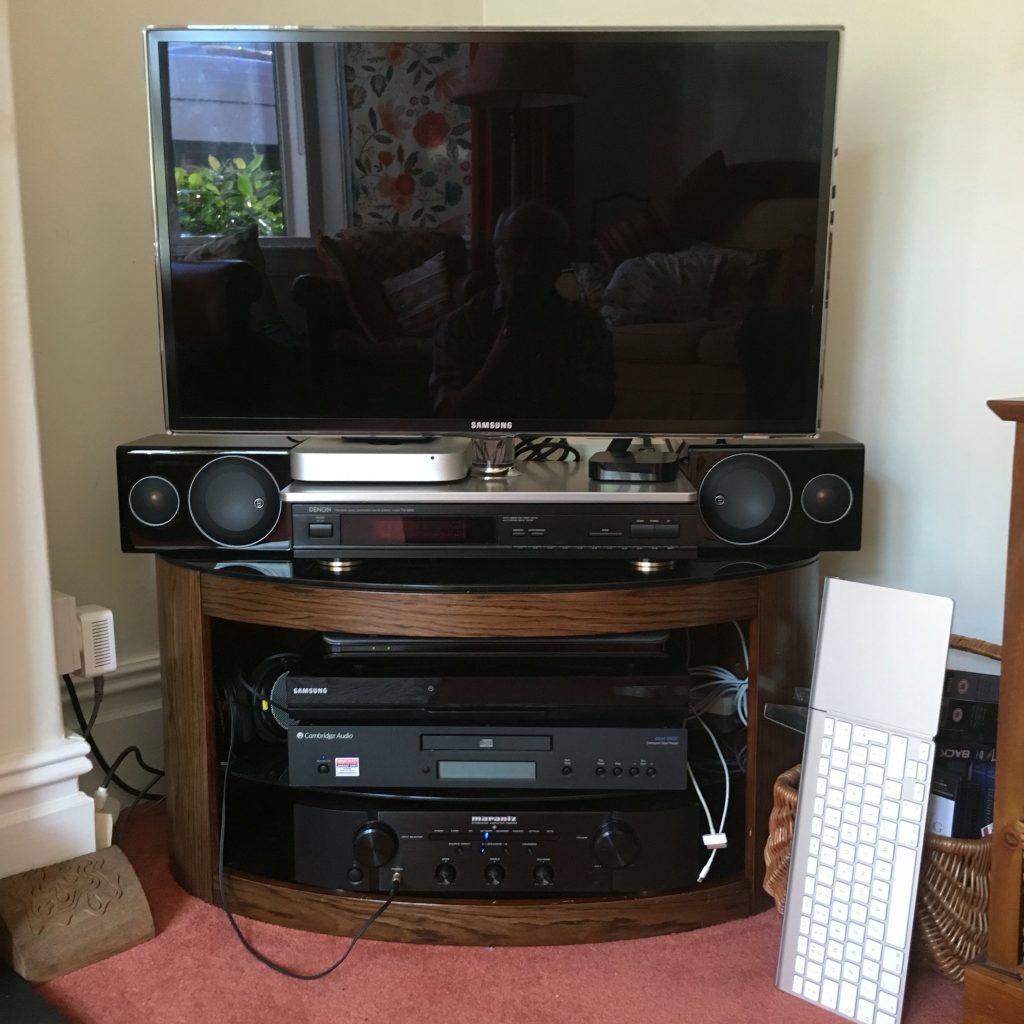
HiFiSo there you have it, a Media Centre with Tuner and CD player; a MacMini, Cable TV, BluRay and an Apple TV all connected to the Smart TV, with the Apple Extreme Router and the Sonos Connect. There’s also a Time Machine backup disk connected to the MacMini which backs up the iTunes Media on the external USB disk.

Job done?!?

 

Workflow, workflow every photographer needs a workflow

This is a subject I return to quite regularly, the last time being May, 2014. It’s an important subject because with digital photography you create many, many images, and if you’re not organised you’ll lose some images you want to keep or use, which can lead to unnecessary frustration and a lot of wasted time.

In the earlier post I detailed how I was using an external hard drive (a WD My Passport Slim) to store all Images and my main Lightroom Catalog. Nothing has changed here – the ability to swap between the MacBook Pro and the iMac for editing working off a single catalog and image store has been invaluable – the only modifications being:

  1. I always do a second copy of my imported images to a Folder on the Hard Disk of the Mac the external Hard Disk is attached to – on both systems this is Pictures > Lightroom Backup > Imports, and
  2. I always backup the Catalog on exit every time to Pictures > Lightroom Backup > Catalogs.

When I’m confident the external hard drive has been backed-up to Time Machine when it’s connected to the iMac, I delete the contents of the Lightroom Backup folder(s) on both systems.

I’ve also decided that I need some “off-site” backup as well, so periodically I ask for a disk, lodged with a neighbour, to be returned so that I can do a complete disk copy of the external hard disk.

I did consider using a cloud drive for the second copies, and the catalog backups, but with the size of the image files now being so large (a single RAW image from the A7r is over 30Mb) there was too much delay being introduced in sync’ing files to the Cloud. So, regretably I decided against that option.

However, an alternative could be to use a Wireless External Hard Drive such as the WD My Passport Wireless with it’s integral SD slot and use another connected Hard Disk to store the Second Copies / Catalog Backups to. I’m considering this option as I hinted in my post yesterday.

[It’s at this stage of the process that I would have liked to have considered using Lightroom Mobile to do the tagging and creation of collections, but my iPad is not up to the task, and the initial release of software didn’t allow me to do the tagging I wanted to do – this may have changed in later releases, I haven’t checked.]

So that’s the hardware part of the workflow sorted, what about the software? Well … Lightroom is very easily configured using Presets to store the images where you want them, to add keywords as you import the images and do certain adjustments (eg for lens, for camera, etc.). It really is important to tag (keyword), and label your images as you import them, so the next stage for me is absolutely vital.

I review every image in the Lightroom Library module and if I’m going to keep it because it has no flaw, I then rate it on a star basis by just typing 1, 2 , 3, 4 or 5, and I add any additional keywords to individual images. That done, I then create a Smart Collection of all the images rated at 3 to 5. This is the collection I then start reviewing in the Develop module.

[An aside mainly for non-Lightroom users. It is important to remember (in Lightroom) that all my non-deleted images are stored in folders (mine are by date) on the drive and that Collections are virtual “pointers” to the originals. Lightroom is a non-destructive photo-editing program. All changes to images are recorded in the Catalog, so you can always go back to any step of the process and move forward from there again – sometimes after creating a virtual copy of the image to store the state of the image before anymore changes are made.]

If, when editing, I consider the rating of the image should be changed, I do just that, which will cause an image to fall out of the Smart Collection. My objective here is to get a set of images rated 4, or 5 that I am going to do further work on. If there are a considerable number of images, I might set up another Smart Collection to reflect this.

Working on this collection I will then colour code the images red (6) – no further work will be done on the image, yellow (7) – work still to be done on the image, or green (8) – finished image,  to indicate where the image has got in the post-processing.

This workflow and image categorisation has served me well in identifying images to be uploaded to Blurb for Photobooks, or for images that might be printed.

That’s where I am this May, I wonder what I’ll be doing next May :-).