

This is an update to the post I wrote in 2018 and has some minor changes (which are highlighted in red) and some changes in the process which are indicated by strikethrough of the text with reasons given in green.
I’ve done this before …
In 2012 – Photography Capture Workflow
In 2014 – Photography, Technology and Workflow – a further update
In 2015 – Workflow, workflow every photographer needs a workflow and Image Portfolios, iPads, field triage and Lightroom
… and last year I was troubled by Adobe’s Creative Cloud subscription model and more particularly I spent an awful lot of time pondering their decision to stop providing a perpetual licence for a desktop version of Lightroom …
In 2017 – “Alas poor Lightroom …” apologies to Hamlet
In 2018 – Decisions, decisions … Adobe Lightroom
and then (again in 2018) – You know how I love posting about Workflow?
… so you may well think – is there anything else I can write about Workflow and Lightroom, but I’m afraid there is, and a second training course on using Lightroom for Cardiff U3A members has prompted me to document exactly what I do … currently 🙂
This post will focus on what you can do with Lightroom using the Library module and how you get images into its catalog. This is safe ground for me because whatever happens to Lightroom Classic (or whatever it’s called next year) I will continue to use Lightroom as a Digital Asset Manager (DAM) … until a better one comes along, at least!
If I should chose to drop out of Adobe’s Creative Cloud subscription model later this year in June, I will only lose access to the Develop and Map modules. I will still be able to use every feature in the Library module, every preset that I’ve setup for use in the Library module, and my catalog(s) will continue to work. Although of course I won’t be able to do any Parametric Image Editing (PIE – non-destructive editing) on my RAW files of ANY images in my Classic catalog(s) as I won’t have the Develop module. However I will be able to either go back to my desktop Lr v.6 catalog(s) which will still have a Develop module and retro-edit images from 2018 onwards which of course I will have to re-import into that catalog (using presets of course), or I can use an External Editor (eg Affinity, Capture One Express for Sony, or Luminar 2018) or I can use External “Edit In …” Plugins (including my Nik collection plugins – now taken over by DxO) that should hopefully continue to work in the Library module, but I will have to save the edits made in these programs back to the Classic catalog(s) as TIFF files, which will be stored and catalogued alongside the existing RAW files that I will continue to import into Lightroom using the Workflow that I’m just about ready to get round to describing!! [After a lot of reflection, I decided that I wanted to concentrate on taking photographs and processing them as quickly as I could using a tool that I’d been using for a number of years and which I knew how to use. I decided I didn’t want any pain from choosing a different piece of software that might not last the test of time; I decided that I didn’t want the pain of learning any new piece of software; or the delay in waiting for that software to catch-up with Lightroom – which would continue to be the market leader; and most telling of all in my reasoning was the fact that I suddenly remembered that basic editing would still be possible in the Library Module if I decided to stop my subscription. I could also still link to external editors from the Library Module for more advanced editing. My most important resource which I really didn’t want to have to replicate – the Catalog – was protected. I could continue to use Lightroom Classic for as long as I wanted to, and for as long as I could afford it!]
Step 1 – It starts with the image. These will either be in the camera – connected by a USB cable to your computer (Copy), already on the hard drive of the computer (Add – as long as they’re in the right place on the disk already), or in my case most probably on a SD-card that I’ve taken out of the camera. Apart from when I’m transferring photos from my iPhone – this will be the way I transfer (Copy) images into Lightroom.
Step 2 – Remember the Library module is a Catalog not a Repository of Images. This is actually one of the hardest things people seem to grasp. They are used to programs grabbing photos and putting them into a database from which it’s then difficult to extract them. They are also used to programs offering to scan their discs for images and then either creating a copy somewhere else, or just recording where they are. Neither of these approaches improve the organisation of your photo library in any way and at worst leads to duplicates of images across disk(s) and difficulty (and needing to resort to operating system functions) to sort out which was the original image.
Step 3 – Work out for yourself where you want to store your master images. For some (like me, for reasons I’ll explain later) that’ll be on an external Hard Disk, for others that’ll be in the “Pictures” folder of their native operating system. Whichever location you chose, work out for yourself the structure of the folder system that you want to employ to store the images. I can’t stress how important this is – once you’ve decided on it you should be thinking that you’ll stick with it for ever, as changes in structures at a later stage are a tedious and time-consuming task. So you might have a top-folder structure based on Place (not recommended as you’ll always be adding new top-level places), or on Date.
You might then decide to have a new top-level folder for every year (this is what I do), and then have sub-folders based on Place – that is logical, but can lead to duplication of sub-folder names, so I use sub-folder names based on Year, Month and Date. Using this sequence will always ensure that the newest images will be at the bottom of the list of folders.
But what about Place, Location or Event – I want to be able to find images by these rather than by Date – which I often forget anyway. That’s where Lightroom’s Keywords and Collections come-in – which I’ll come to later.
Step 4 – Automate your Import of images into the Catalog as much as you can. This is where we need to look at Settings in Lightroom, and the possibility of creating Presets to apply the same settings at every import.
I’m not going to describe the Library and Import screens, that is well done elsewhere …
and
… what I’m going to do is describe what I do. It’s not the right way, there are an infinite number of right ways, it’s just the one I’ve developed over 10 years to be the best one for me.
As I indicated in Step 1, I will always be doing a Copy of the image onto my hard disk – I described how I now use an external SSD device to store my images (and catalogs) in a an earlier post, and this is what the top-level structure looks like …
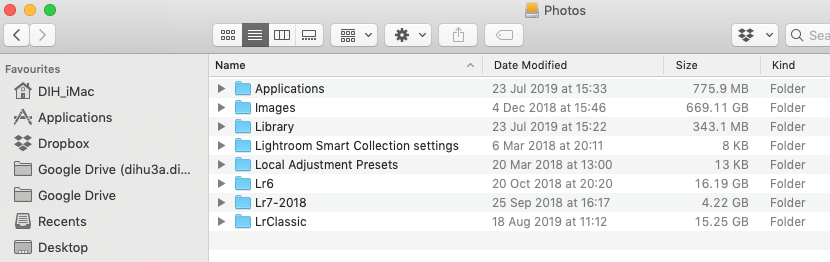
… you can see all my images are in one top-level folder on the External Disk – Photos 2019 – I have decided – to speed up processing – to use a dedicated Rugged SSD (from Lacie with Thunderbolt and USB-C connections) and then move the images within Lightroom to a Master Disk at the end of the year when I make a copy of that disk also for archiving purposes. There are two more catalog folders above: for my standalone desktop version of Lightroom (Lr6) which I stopped using at the end of 2017; and the new Classic (LrClassic) version which was a copy of Lr6 when I decided to upgrade to Classic at the beginning of the year, with everything else in it since then – these are not relevant to this discussion. [Adobe changed its naming and numbering during 2018, and Lr7 became Lr8, or LrClassic.]
This is an important topic in its own right – where do you store your Catalog? It’s so well covered in this article that I’m not going to try and replicate it and this in turn leads to a decision you need to make on changing the default location of where your Presets are stored which is described in this article. In my case I’ve decided to store my Catalog on the same external disk as I store the Current Year Images, my Presets with the Catalog and some Applications so that I can have the same desktop as I move between computers. Magic and Amazingly Powerful!
Open the Images folder, and you’ll see this …

… these folders stretch way-back to 1967 and are populated as I scan images in from transparencies and negatives as well. [The stars against a few folders indicates that I have to retro-fit my key-wording and Collections methodology to some of the images in these folders – I can remove these as and when I complete the task WITHIN Lightroom, not the operating system!]. Look in a year and you’ll see this …
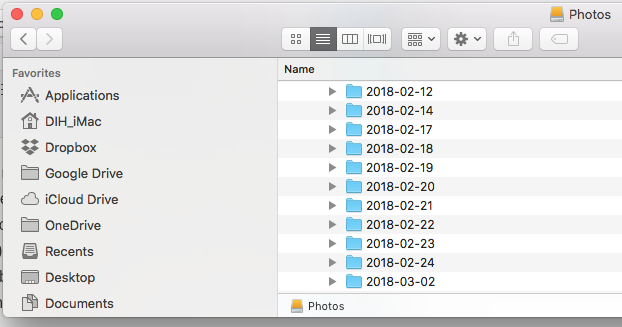
… not very informative, but extremely accurate! Open a folder and that’s where the images will be …

… this is the only part of my Workflow that I’m likely to change I have changed. I think I may start re-naming I now rename the files to make them a bit more meaningful and recognisable. A decision I came to whilst preparing the first Course!!
So now looking at Lightroom. I will select Copy …

… and make sure that they’re going to be copied to the correct location, and that I’m not importing duplicates. I won’t be doing a backup of them as I’ll leave that to my automatic backup on the computer I check that the Second Copy location is checked and the location on a Google Drive is correct, I won’t be adding them to a Collection (as I’ll do that later) and I won’t be building Smart Previews as I won’t be using Lightroom Mobile, and I want the import to be as quick as possible so I’ve chosen Minimal for the Previews that will appear in the Library module …
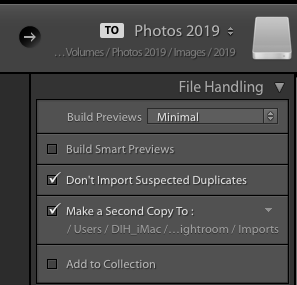
I may change my mind on these latter options. I have started adding some images to Collections at the time of Import, and as I may begin to use Lightroom (mobile) more in the future, I may decide to build Smart Previews.
As I’ve already said, I’m currently not renaming the files – this will probably change to a renaming I’ve decided to rename based on Location or Event, but the destination will be determined by the file structure I defined for the Photos external disk (and described above).
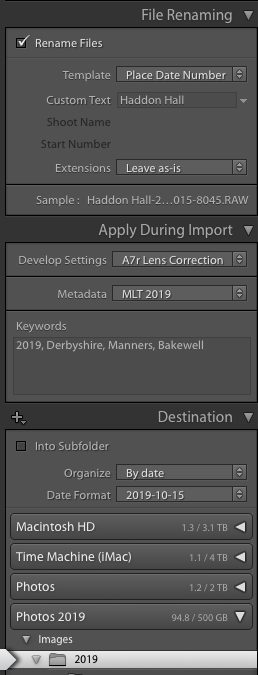
However you will notice that you do have the chance to apply some changes to your images at the time of import and this is where the first of the Presets come into play. I apply a Lens Correction for my camera and I’m applying some Metadata – I’ll come to show you set these up in a later post.
But how can I make sure I do the same thing every time? That is where the most important, and probably the first Preset you’ll ever create comes in. At the bottom of the Lightroom panel you’ll see Import Preset and a pull-down menu which says None. Click on it and in my Lightroom you’ll see this …
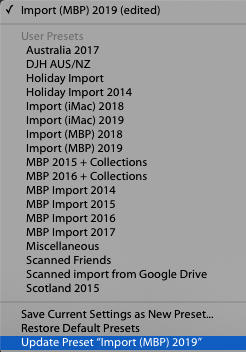
… I would normally select (this year) – Import (iMac) 2018 – and this would be determined by how I’d set the parameters above. The only major change each year being the change in the Copyright Date in the Metadata. So you can do changes to the settings and either Save them as a New Preset or Update the current setting – that’s how easy it is to set this Preset up.
Step 5 – Import your images. The shortest section of the lot, you just sit back and watch the images appear in the Library module.
Step 6 – Preview and rate your images, select some for deletion. Again this is a very personal decision how you approach this task. I tend to go through them all, marking ‘X’ for deletion, 3 for an image worth processing, 2 for an image worth at least keeping and 1 for an image that I don’t want to delete but I just want to keep it for some reason or other. Later on I will use 4 and 5 ratings after post-processing in the Develop module. I will also use Colour Labels – 6, 7, 8, 9 and 0 to indicate what I want to do with them after processing. But these are details beyond this post on Workflow.
Step 7 – Closing down Lightroom and taking a rest! You’ve earned it if you’ve got this far. After you’ve done your Import your card/device will have been ejected from either the Card Reader, or from the USB port. It is safe to remove it from your computer. This is when I add a new USB-stick drive to the vacant USB port, because this is where I will store (temporarily) the Backup to my Catalog as I exit Lightroom. It’s only temporary storage, I will copy them off the stick onto a location on my Google Drive after a while so they’ll be backed-up there to the cloud, and then I’ll clean the USB-stick off. [I decided subsequent to writing the original post that I would do a Backup of the Imported images, which I would save in a Google Drive Folder, and I would also save a Backup of the Catalog to another Google Drive Folder when I exited Lightroom. These I delete after I know that both the Images and Catalog have been backed-up to my Time machine Backup – Apple’s Backup System for the Mac range.]
As you sit back thinking of all that work, and has it been worthwhile, just remember to clean your SD-card connections with an alcohol (lens cleaner will do) wipe and Format it when you re-insert it back into the camera. It’s so much better to format the card, rather than just delete the old images.
PS Why the image at the top? It’s the first image that I took which I considered to be better than a “snap”. Taken a few years ago now, my photography journey has proceeded from this image. I always come back to it.
One Reply to “Lightroom Workflow (2019)”